Stencil library
Hummingbird tattoo stencil
Hummingbirds are tiny in life and usually tiny as tattoos, which makes the stencil a feather-count problem. A photo shows dozens of overlapping feathers per wing; at three inches you can transfer perhaps eight. The stencil below keeps the beak as the sharpest line on the page, draws the wing as a fan of a few feathers, and lets the tail and body stay as clean curves.
- Sample stencil, Stencify style
- Line work for thermal or hand transfer
- Prints on A4 or letter
- Updated Oct 4, 2026
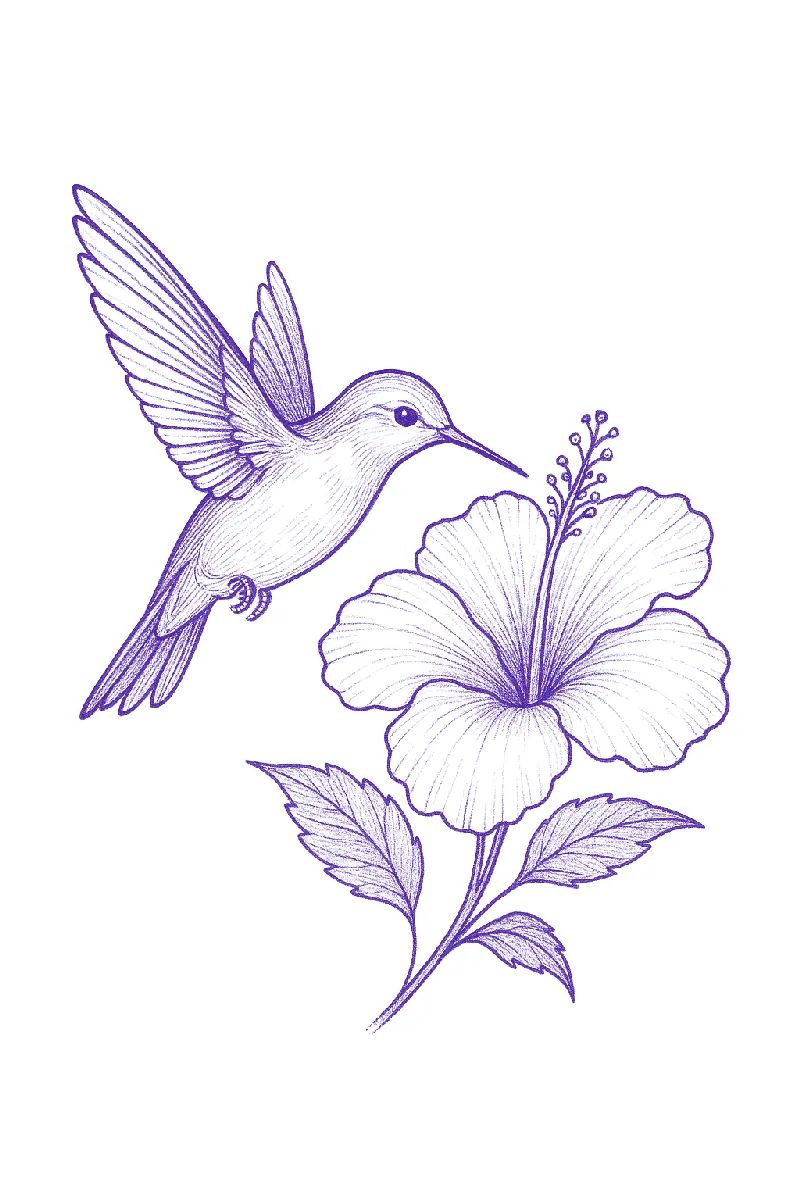
What a good hummingbird stencil needs
- Beak drawn as two thin lines meeting at a true point. If the converter rounds the tip, fix it by hand.
- Wing feathers as six to ten clear shapes per wing, each with a single edge line, not as photographic texture.
- Body outline from throat to tail as one smooth curve, with the eye marked as a small circle.
- Tail feathers separated, with the longest two drawn slightly heavier so the silhouette reads from a distance.
Styles and how the stencil changes
Fine line
Thin outline, a few wing lines, no fill. The most common hummingbird tattoo today and the easiest to stencil.
Watercolour
Outline only on the stencil; the colour is painted freehand. Print the outline lighter than usual so it does not show through soft colour.
Realism
Outline plus feather edges on the near wing and a value guide on the throat. Keep the far wing simpler.
Traditional
Bold outline, simplified wings with three or four feathers, often with a flower. Put the flower in the same reference.
Placement and size
- Wrist and inner forearm: two to three inches, wings spread horizontally.
- Shoulder blade: four to six inches, often paired with a flower the bird is feeding from.
- Ankle and behind the ear: under two inches, fine-line version only.
- Ribs: a vertical composition with the bird diving toward a flower, five to eight inches.
Make your own hummingbird stencil from a reference
- Choose a photo with the wings frozen and spread, not blurred mid-beat. Motion blur converts to nothing useful.
- Crop to the bird and the flower if there is one. Remove feeders, branches and sky gradients.
- Convert and raise contrast until the feather texture drops to a handful of edges per wing.
- Check the beak and the eye. These two marks carry the whole design; sharpen them by hand if needed.
- For fine-line placements, lower line weight to the minimum that still prints solid, and try it on at real size.
Stencify does the conversion step in about 30 seconds on iPhone, iPad or Android, with line weight and contrast controls, try-on at real size, and PNG or PDF export sized for stencil paper. The first two uses are free: get it on the App Store or on Google Play.
Frequently asked questions
How many feathers should a hummingbird stencil show?
Six to ten per wing at a typical three-inch size. More than that and the feathers merge on the transfer. Realism pieces at five inches or more can carry a few more on the near wing.
Can I make a hummingbird stencil from a watercolour painting?
Yes, but raise contrast heavily so the soft colour fields drop out and only the edges remain. Watercolour references work best when there is a clear ink outline under the paint.
What is the smallest a hummingbird tattoo stencil can go?
About an inch and a half with outline only. Below that the beak and tail feathers merge, and the design should be simplified to a silhouette.
More subjects
Related reading
- How to Make a Tattoo Stencil - the full method from reference to skin
- How to Make a Tattoo Stencil From a Picture - converting photos step by step
- Tattoo Stencil Designs - the full gallery with notes on line weight
Convert your own hummingbird reference
Photo or sketch in, clean line work out in about 30 seconds. Two free uses, then $4.99 a week or $47.99 a year.

