Stencil library
Koi fish tattoo stencil
Koi are almost always tattooed in motion, swimming up a forearm or around a calf, so the stencil has to carry the body curve more than anything else. Scales are the trap: a koi photo shows hundreds of them, each catching light differently, and a converter will produce a net pattern that transfers as grey. The stencil below keeps the head, barbels, fin edges and body curve, and suggests the scales in a few rows.
- Sample stencil, Stencify style
- Line work for thermal or hand transfer
- Prints on A4 or letter
- Updated Oct 4, 2026
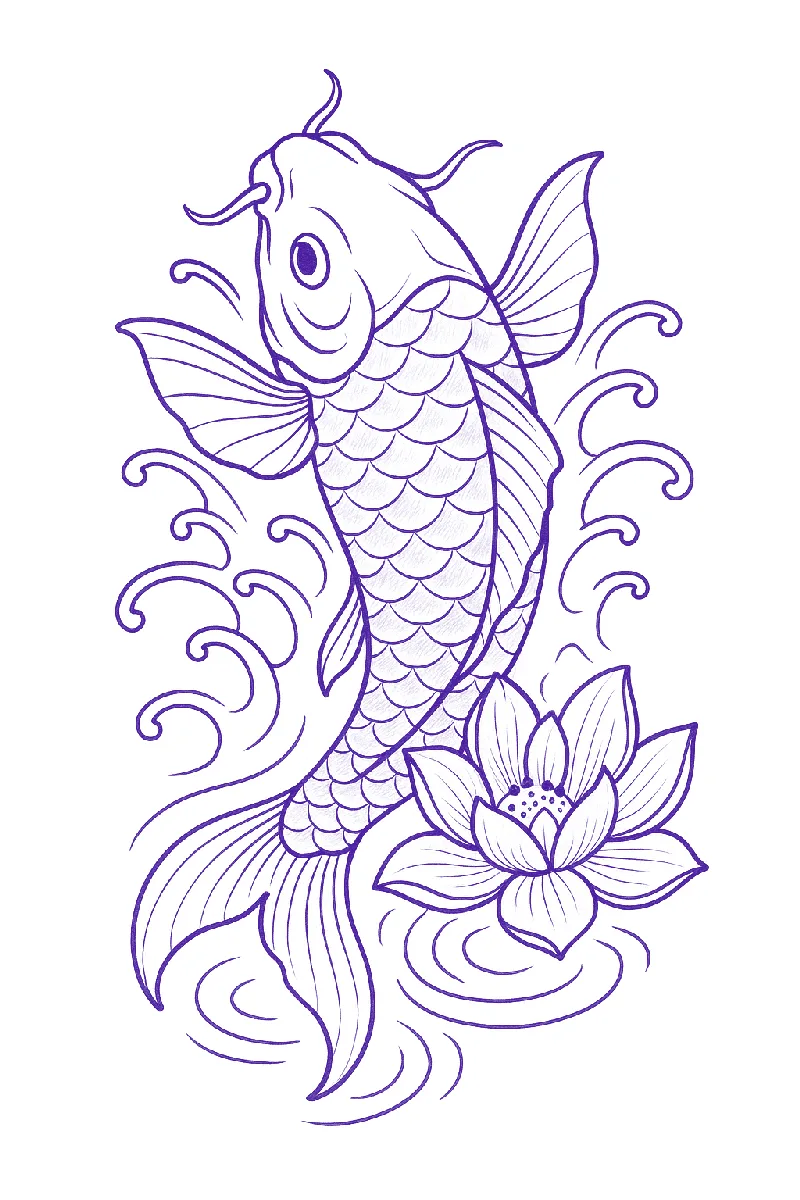
What a good koi fish stencil needs
- Body curve as one continuous line on each side, with the tail flare drawn at the same weight as the head.
- Fin edges drawn as clean, slightly ragged outlines. The ray lines inside the fins should be sparse, four to eight per fin.
- Head with the mouth, eye and barbels (the whiskers) clearly marked. The barbels are what make it read as a koi rather than a goldfish.
- Scales as two or three rows along the back and side, drawn as overlapping arcs, with the belly left clean.
Styles and how the stencil changes
Japanese (irezumi)
Bold outline, water and maple leaves or lotus in the same composition. The scale pattern is drawn as a regular grid of arcs rather than converted.
Fine line
Thin outline with fin rays and no scales. Common on the forearm and ribs at four to six inches.
Realism and colour
Outline plus a value guide for the colour patches (the black, red and orange blotches). Mark the patch edges lightly so the artist can place colour.
Blackwork
Heavy outline, solid or hatched patches, strong water lines. Convert the fish, then add water in the editor.
Placement and size
- Forearm, swimming toward the hand or the elbow depending on the meaning the client wants. Rotate the reference before converting.
- Calf and shin: vertical, six to ten inches, often with water wrapping the leg.
- Ribs: a long vertical koi at eight to twelve inches, printed on two sheets.
- Shoulder to chest: a pair of koi circling each other, which should be composed as one reference.
Make your own koi fish stencil from a reference
- Pick a photo from above with the whole fish visible. Side views lose the fin shapes; partial views lose the curve.
- Crop to the fish. Water ripples and pond floor produce heavy noise.
- Convert, then raise contrast until the scales thin to a few rows. The fin edges should still be clear.
- Check the barbels and the eye. If they are gone, lower contrast slightly or redraw them in the editor.
- Add water lines or leaves in the editor before printing so they share the line weight of the fish.
Stencify does the conversion step in about 30 seconds on iPhone, iPad or Android, with line weight and contrast controls, try-on at real size, and PNG or PDF export sized for stencil paper. The first two uses are free: get it on the App Store or on Google Play.
Frequently asked questions
How do I draw koi scales on a stencil?
Suggest them. Two or three rows of overlapping arcs along the back and side, with the belly clean. Full scales from a photo will not transfer below about 3 mm.
Which way should the koi swim?
Clients often attach meaning to upstream (toward the head, struggle) versus downstream (toward the feet, success). Confirm with the client, then rotate the reference before converting so the stencil prints the right way.
What size koi works on a forearm?
Six to nine inches long and two to three inches at the widest point. Print at 100 percent and check with try-on before the appointment.
More subjects
Related reading
- How to Make a Tattoo Stencil - the full method from reference to skin
- How to Make a Tattoo Stencil From a Picture - converting photos step by step
- Tattoo Stencil Designs - the full gallery with notes on line weight
Convert your own koi fish reference
Photo or sketch in, clean line work out in about 30 seconds. Two free uses, then $4.99 a week or $47.99 a year.

