Stencil library
Praying hands tattoo stencil
Hands are the hardest subject to draw and one of the easiest to stencil badly. Praying hands add the problem of ten interlocking fingers where the order of overlap has to be right, plus a rosary that is forty small circles. The stencil below keeps each finger as a closed shape with a clear overlap, marks the knuckles and nails, simplifies the sleeve folds, and draws the beads as evenly spaced circles.
- Sample stencil, Stencify style
- Line work for thermal or hand transfer
- Prints on A4 or letter
- Updated Oct 4, 2026
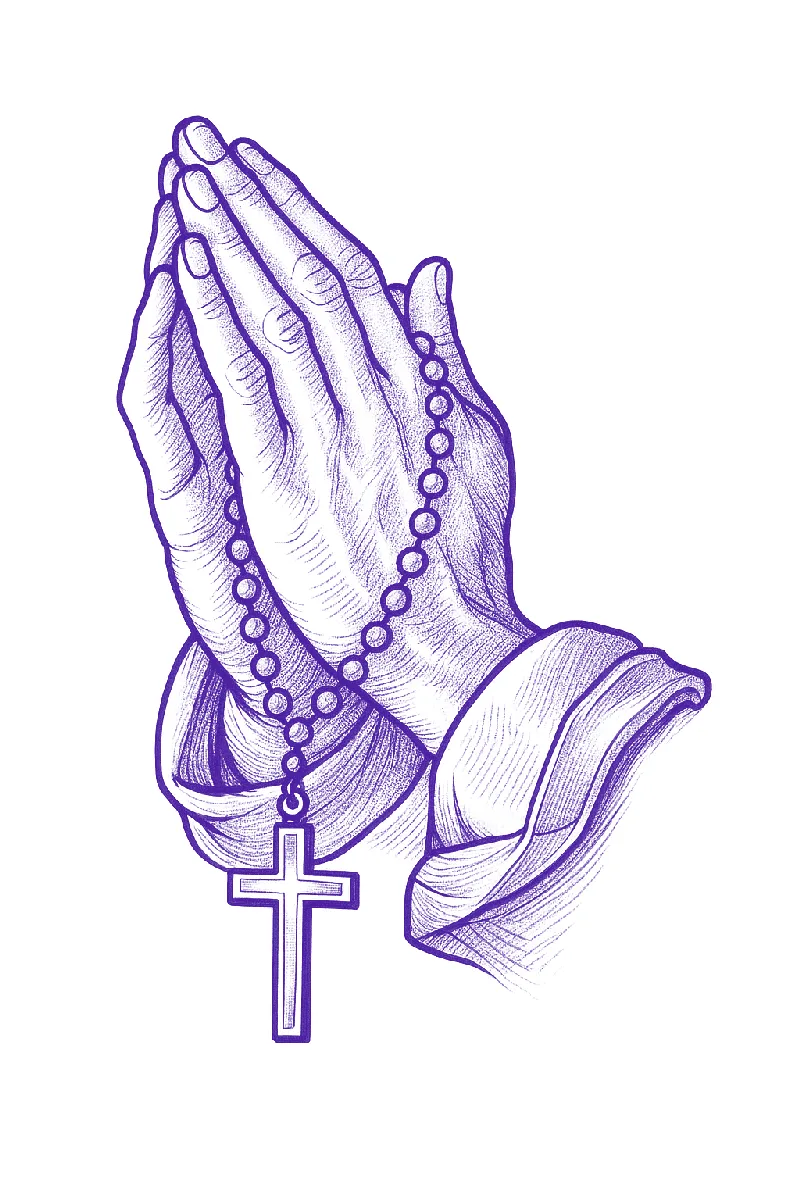
What a good praying hands stencil needs
- Fingers as closed shapes with the overlap order clear: where one finger passes in front of another, the back finger line stops.
- Knuckles and nails marked with short lines, not shaded. These are what make hands look like hands at stencil size.
- Sleeve or wrist folds reduced to three or four lines. Photo folds produce dozens.
- Rosary beads as evenly spaced circles on a single string line, with the cross drawn heavier.
Styles and how the stencil changes
Realism
Full finger and knuckle detail, folds as a value guide. The most common version, usually four to seven inches.
Traditional and chicano
Bold outline, simplified fingers, often with a rosary, cross or banner. Convert line art for the cleanest shapes.
Fine line
Outline of the hands only, no knuckle detail, often small and placed on the inner forearm.
With text
Scripture or a name on a banner below. Set the text in a design app, add it to the reference, convert together.
Placement and size
- Inner forearm: vertical, four to seven inches, fingers pointing toward the elbow or the wrist.
- Outer bicep: five to eight inches, often with a cross or dove above.
- Calf: six to nine inches with rosary beads trailing down.
- Chest: hands at six to eight inches, centred, with text below.
Make your own praying hands stencil from a reference
- Use a reference with the hands against a plain background and lit from one side so the fingers separate.
- Crop to the hands and the first few inches of sleeve. Everything else is noise.
- Convert and raise contrast until skin texture and most folds disappear. Fingers should remain as clear shapes.
- Check the overlaps. Fix any back-finger line that runs through a front finger in the editor.
- Add rosary, cross or text before converting, or draw them in the editor at matching weight.
Stencify does the conversion step in about 30 seconds on iPhone, iPad or Android, with line weight and contrast controls, try-on at real size, and PNG or PDF export sized for stencil paper. The first two uses are free: get it on the App Store or on Google Play.
Frequently asked questions
Why do the fingers in my praying hands stencil merge together?
The reference is lit flat, so the converter finds no edge between adjacent fingers. Choose a side-lit reference, raise contrast, and separate any merged fingers by hand in the editor.
How do I stencil rosary beads?
As evenly spaced circles on a single string line. Convert the hands first, then add beads in the editor or from a clean rosary reference, so they come out at one size.
What size should praying hands be on a forearm?
Four to seven inches tall. Below four inches, drop the knuckle detail and use the fine-line version.
More subjects
Related reading
- How to Make a Tattoo Stencil - the full method from reference to skin
- How to Make a Tattoo Stencil From a Picture - converting photos step by step
- Tattoo Stencil Designs - the full gallery with notes on line weight
Convert your own praying hands reference
Photo or sketch in, clean line work out in about 30 seconds. Two free uses, then $4.99 a week or $47.99 a year.

